Make Money Online In Pakistan Join Now

Check Page Rank of any web site pages instantly:
This free page rank checking tool is powered by Page Rank Checker service

Followers

Setup and Configuration HOW-TO


Installing the DOS partition

Since you will NOT be installing DOS to the entire hard disk, but to just a small portion of it, you will need to be careful to not let the automatic setup program for DOS configure your hard drive partition for you, as it will want to fill the drive with DOS and you'll not have any room left for Linux.


When you first boot into the DOS setup program you will want to hit F3 twice to exit the setup and get to the A: prompt.

When pondering how much space to leave for DOS, remember that a very pared down Slackware Linux will require about 700meg (500meg for the root partition, 100meg for a swap partition, and 100meg for a /jnos partition).


From the A prompt you will want to use FDISK to access the hard disk and first view the present partitions on the drive. Do NOT just delete all the partitions on the drive first-- as that can be counterproductive depending on what's on that drive.
When you are viewing the partition table, if the whole drive is just one giant DOS partition then yes, you should delete that whole partition.

On the other hand, many Compaq owners, some Dell and IBM owners (and other manufacturers) will have what are called 'maintenance' partitions on the drive. These 'maintenance' partitions are NON-DOS partitions and usually relatively small. You will want to keep any of these small NON-DOS partitions so that your machine BIOS configuration and maintenance functionality can be maintained.

If your machine is already setup with a small DOS partition and a larger secondary partition you might want to leave the smaller DOS partition in place and delete the secondary partition-- this will save you from having to install DOS (though, installing DOS is not a big deal).

Jnos for DOS does not require much room, 100meg should do most hamgates quite well.

I made a 500meg DOS partition (of the 5gig hard drive) in the machine used in writing these pages. 500meg is plenty more than the DOS Jnos would ever need and perhaps a bit of overkill.

Please also be aware that the DOS partition will also be available for use while you are running Linux, so the space set aside for DOS is not lost when you are not running DOS.


After you are done with the DOS Fdisk partition table tool you can reboot into the DOS installation floppy and let it do it's automatic install of DOS, as it would now just be putting DOS into that smaller partition on your hard drive.

I'll get into installing Jnos on DOS after I complete the pages on installing Jnos on Linux-- so you will have to wade through all the Linux work first.

Yea-- I'm mean and heartless. Waaaaa!

Read more...

Slackware-Linux Installation A


Installing Linux Slackware 10.1

OK... Now it's time to put that first Slackware 10.1 CDrom into the CD drive and power up the computer--- cross your fingers as you do this.The Slackware ISO CD#1 is a bootable Linux CD and if your CD player knows how to deal with bootable CD's (and the BIOS of your machine is set to boot from CD-- check that if there's trouble) you should see lots of action on the screen when the machine boots up.When this 'action' stops, you will see at the bottom left of the screen the prompt 'boot:'


When you get the 'boot:' prompt, hit the ENTER

key. You'll see lots of text fly by on the screen-- read every word if you can, but don't feel bad if you can't remember much of it.Hit ENTER again when you get asked to select a keyboard map.

You will be shown an 'IMPORTANT' message... as it will warn you of some of what will be going on shortly.When it tells you to login as root with the 'Slakware Login' prompt, type 'root' and then hit ENTER.

If it says 'Linux 2.4.29...' then you're logged in.

At this point, you need to setup the Linux partitions on the hard drive.

Type 'cfdisk' to start the Linux version of Fdisk.

You will see at the top of the screen your present DOS 'FAT16' (or FAT32) partition-- you want to keep the DOS-FAT partition!

While it is highlighted, you want to use the right and left arrows to highlight 'bootable' on the bottom of the screen and hit ENTER to toggle the 'bootable' flag to OFF (no bootable showing) for that DOS

partition.

Please remember that the linux root partition (usually 'hda2') will need at least 500meg for a pared-down bare bones Slackware Linux.

Add to this that you'll want to add a 100meg or more swap partition and a 100meg or more /jnos partition.

Now you want to use the down arrow to 'free space' and then use the right arrow to select 'NEW'. Hit Enter.

We are now configuring what Linux calls /dev/hda2 -- this will be the partition that the main Linux operating system will reside on. It's also known as the 'root partition'. When it asks you how large to make this partition, you want to make it fairly large-- so you can load lots of Linux programs and features. On my 5meg drive, I chose 3.5meg for this partition.

I would recommend you choose at least that size too, as it is assumed your /dev/hda2 (or '/' or 'root') partition is at least 3.5meg in these instructions-- you'll see why later on.

Before we leave the /dev/hda2 partition, you will want to use the right/left arrows to highlight 'bootable' and then hit ENTER to make that partition bootable.


Next we hit the down arrow again and highlight 'free space' and then right arrow over to NEW. We will now create the 'SWAP' partition. This is where the Linux version of the Windows 'swap file' goes.
In my case, I selected a swap partition of 255meg. While our new /dev/hda3 'swap' partition is highlighted, we want to use the right arrow and move it over to TYPE and hit ENTER.
Now we see a screen which lists all the different types of partitions you can make with this great linux cfdisk tool. As you can see, you have quite a selection.


Hit the spacebar to get to the second page.

Notice that under the list it says 'TYPE: 82'. This is what we want. Type 82 is a Linux swapfile type. If it doesn't say 82, make it say 82. Hit ENTER once the TYPE is 82.


Finally, we hit the down arrow again into free space and then right arrow over to NEW and create our final jnos partition.

Use up all the remaining space of the hard drive with this new /dev/hda4 partition. As long as you have 100meg or more your Jnos will be happy.

I suggest putting Jnos on it's own partition as this will allow you to have fun upgrading Linux later on and not have to worry too much about erasing your Jnos files. It's very handy to keep it separate.

When you have no free space left on the drive, you MUST right arrow over to the WRITE command in order to write the new partition table to the hard drive. Follow the prompts and type in 'yes' when it asks you to.

Before you quit out of CFDISK, make sure you have written down what the names of the various partitions are and what they will be used for. hda1=dos, hda2=linux root, hda3=swap, hda4=jnos. Failure to write this down will cause you considerable misery very soon.

When it's done writing to the partition table, use the right or left arrows to highlight QUIT and then hit ENTER to get back to the Linux setup screen.

Read more...

Slackware Installation B


Slackware Installation B

Now that you've created the partitions needed on the hard disk it's finally time to actually install Slackware Linux onto your machine.

From the linux prompt (root@slackware) type SETUP and you will be greeted by the spartan blue 'somewhat graphical' screen of the slackware setup program.

Hit the down arrow button and select the ADDSWAP option and then hit ENTER.

When we created the linux 'swap' partition earlier with CFDISK it was created as 'hda3' on the drive. Linux will address that partition as '/dev/hda3' . (please ignore the /dev/hda4 in the image to the right as it was taken during a different Linux installation).


We need to tell the setup program that this is what we want. Setup will generally find our swap partition and present the proper information, hit ENTER if what is presented on the blue screen is appropriate. (it should be!) It will automatically format
the swap partition for you.
When you get to the screen 'swap space configured', hit ENTER to continue.

You will now be given the opportunity to tell SETUP which partition to use for the main Linux installation (often called 'root') partition. The root partition is denoted as '/' and is where the main operating system (Linux) files will be put.

In CFDISK we created this root partition as 'hda2' and we will want the SETUP program to identify it as /dev/hda2.Make sure the /dev/hda2 is highlighted and then hit ENTER.


You will be prompted if you wish to format the new partition. Since most of us are in a rush, the quick format is OK.

If you suspect your hard drive is flaky and are too stubborn to toss it in the dumpster (where bad hard drives belong) then select the full check. Either way, you DO want to format this partition.


You can now select what type of filesystem you wish to use. Either ext2 or ext3 will work. I've been using ext3 for no really good reason.


Now-- on the next screen you're shown some really hi-tech stuff. Block size and inodes. For the linux partition ('root' or /) where the linux system files are kept, we are best to use the default. We will NOT use the default for the Jnos partition-- as most of what Jnos puts on the hard drive are very small text files.

So, since this is the root linux partition, leave the default 4096 highlighted and hit ENTER. Slackware setup will now format the root linux partition.


When the root partition format is done we will be given the screen to 'Select other linux partitions'.

On this page we hit the down arrow if needed and highlight the /dev/hda4 partition-- that's where /jnos will be. Hit ENTER when it's highlighted.

As before, a quick format is fine, and select ext3 for the filesystem type.


This time around, when we get to the block size/inode page, we will select the 1024 setting. One 'inode' per 1024 bytes. This will allow your hard drive to be more fully packed with jnos text files.


When it has finished formatting, it will ask you for a 'mount point'. You want to enter '/jnos' in the box and hit ENTER.


When you're done adding the SWAP, ROOT, and JNOS partitions you should see this screen showing that it will be adding them to the /etc/fstab file. This '/etc/fstab' file is where Linux looks to see what drives (hard drives, cdrom, floppy) are connected to the system.
Slackware setup will now display a screen saying that a FAT partition has been detected. Oh my God-- Where's Richard Simmons when you need him!

YES you do want to add the FAT partition to your fstab file. This makes that DOS partition (known as FAT in linux-speak) available to you from within Linux (which is rather handy). Make sure YES is highlighted and hit ENTER.

Make sure the FAT DOS partition of /dev/hda1 is highlithed and hit ENTER.

You can now pick a mount point for the DOS directories. I have been choosing '/dos' or '/fat-dos' as my selections. One drawback to just calling it '/dos' is that it might bet confusing for you at some point-- you might forget you're in Linux, so /fat-dos might be better.

ou will next be greeted by a screen that will allow you to select where the 'source media' is for your Slackware-Linux installation.Since we're installing off a CD-ROM, select the SLACKWARE CD and let it automatically scan for the CD.In most cases it should find the CDrom at/dev/hdc.


If SETUP does not find your CDrom drive, then you have a major problem. Time to get out the sledgehammer and correct it. If you don't have a sledge, a 9mm piece of lead (jacketed in copper or not) through the CDrom drive should fix things good.

Read more...

Selecting Slackware Packages


We are now up to the point of installing the Slackware 'packages'.

In the Linux world, the various programs (or groups of programs) are called packages.

Since Linux is used in a wide variety of diverse computing applications, it's a rare case where an installation would want to have every package a available installed.

For someone planning to use Linux as an office desktop, you would want the graphical 'X' applications and associated software. X provides a very nice graphical user interface comparable to what Windows or Macintosh users are familiar with.

For someone like us, planning to use Linux for a Jnos server, the 'X' stuff is unnecessary and just adds to clutter on the machine (and takes up tons of hard disk space!).

Depending on the amount of hard drive space you have placed in the root partition, you may or may not have room for the 'X' graphical programs.

Your Jnos system will function fine if you install everything that is offered.

I will assume, however, that you want to install a fairly basic 'bare bones' Linux and will guide you with that in mind. If you have doubts as to whether you will use something you can add and delete packages later if you wish to make a change.

Jnos does not require much of Slackware Linux in order to run, and you're better off installing less than more.

On the PACKAGE SELECTION screen, select ONLY the following and make sure any of the other selections do NOT have the 'X' for selection associated with them.

To select or unselect you use the up and down arrows to highlight an item and then use the spacebar to 'toggle' the status (selected vs unselected) of that item.

You want only the following selected for a basic Jnos installation:

A - Base Linux System
AP - Various applications that do not need X
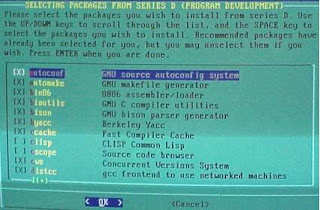
D - Program Development
F - FAQ lists and how-to documents
K - Linux kernel source
L - System libraries
N - Networking

Effectively, you are making sure that you have UNSELECTED 'Series T', Series TCL, 'Series X', 'Series XAP', and Series Y'


When you are given the option for 'prompting mode' select EXPERT.

In the following sections, there are a few items shown as '(this is OPTIONAL) ' which means that if you have a machine very low on hard drive space you can elect to NOT install these packages as well. If you really pare things down you can get Slackware Linux to install on a 500meg root partition, otherwise it'll take up plenty more space.


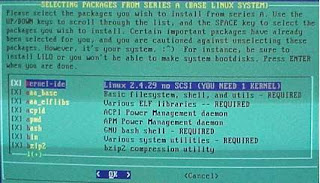
Base Linux System Packages:

[all the 'required' packages are selected to be installed.. only a few are not. If your machine supports USB then you should install the packages that deal with USB also]

In this section, you will be installing all the defaults but will want to UNSELECT the 'pcmcia-cs' and 'xfsprogs'items

After you make the above unselections, you should note that
the system shows that it plans to install the following items:

kernel-ide linux 2.4.29 no scsi
aaa-base basic filesystem
aaa-elflibs various elf libraries
bash gnu bash shell
bin various system utilities
bzip2 compression utility (this is OPTIONAL)
coreutils core gnu command line utils
cxxlibs c shared libraries
dcron cron daemon
devs device files
e2fsprogs utilities for ext2/ext3 filesystems
elvis text editor
etc system config files
findutils gnu file finding utils
floppy utils for using dos floppies
glibc runtime glibc support libraries
glibc zoneinfo configures your timezone
grep searching tool
gzip compression util
hdparm get/set hard drive parms (this is OPTIONAL)
infozip zip utils (this is OPTIONAL)
isapnptools plug-n-play config tools (this is OPTIONAL)
kernel-modules linux kernel modules
less text pager
lilo boot loader
loadlin boots from msdos
logrotate system log roataion util
minicom serial transfer and modem comm
module-init-tools kernel module utils
openssl-solibs openssl shared libar (this is OPTIONAL)
pciutils linux pci utils (this is OPTIONAL)
pkgtools slackware package management tools
procps displays process info
sed gnu stream editor
shadow shadow password suite (this is OPTIONAL)
slocate locates files on system (this is OPTIONAL)
smartmontools (this is OPTIONAL)
sysklogd (this is OPTIONAL)
syslinux
sysvinit
tar
tcsh
udev
umsdos-progs
utempter lib for writing utmp/wtmp (this is OPTIONAL)
util-linux util linux utils


Selecting packages from series AP applications:

You will want to UNSELECT:
a2ps, alsoa-utils, amp, aumix, espgs, flac, ksh93, lsof, madm, mpg321, mt-st, normalize, quota, raidtools, rexima, rpm, sox, vorbis-tools, workone, zsh.

You will want to SELECT: at, sudo

After making the above selections and unselections you should
note that the system plans to install the following:

at schedule commands to execute at a later time
groff gnu groff document formatting system
(this is OPTIONAL)
jed programmers editor
(this is OPTIONAL)
joe text editor
lsof list open files
(this is OPTIONAL)
lvm logical volume manager
man online documentation reader
man-pages online documentation
mc midnight commander file manager
quota user disk quota utils
(this is OPTIONAL)
rzip large file compression util
(this is OPTIONAL)
screen ansi/vt100 terminal emulator
sudo allow special users limited root access
(this is OPTIONAL)
texinfo gnu texinfo documentation system
(this is OPTIONAL)


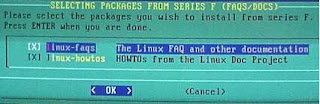
Selecting packages from series F - FAQ-docs

Select both entries shown

Selecting packages from series K - Linux Kernel Sources

Select Linux kernel 2.4.29


Selecting packages from series L - Libraries

Sometimes it's safest to just install all the libraries, or all the default libraries. For our minimalist Jnos/Linux installation we can unselect quite a few libraries and save space. You can skip this section if you have plenty of hard disk space.

Unselect the following:
alsa-lib, arts, aspell, aspell-en, atk, audiofile, esound, expat, gdk-pixbut, glut, imlib, jre, lcms, lesstif, libao, libart_lgpl, libcaca, libexif, ligblade, libgsf, libid3tag, libmad, libmng, libpng, libtiff, libungif, libwmf, netpbm, pilot-link, sdl, slang, taglib, wv2, xaw3d.

Leave the other library files in their default state of selection.

Selecting packages from series N - Network.

Unselect the following:
apache, bitchx, dnsmasq, epic4, getmail, irssi, lftp, links, metamail, mutt, nmap, pidentd, popa3d, procmail, sendmail, stunnel, tin, trn, vsftpd, wireless-tools, ytalk Select the following: forward
Leave the other items in their default selection state, unless you're familiar with the servers and know you will not be needing them. Jnos doesn't use the Linux servers, so all you really need here is 'forward' and 'inetd' the

super-server.

Setup may prompt you for installation of X servers and X applications.

It only does this if you had not DE-SELECTED those as advised on an earlier screen. If you have room on the hard drive, and wish to install the X graphical user interface stuff, by all means do so.

When it is done asking you what you want to install, the computer will spend some time thinking about how it'll get all that stuff off the CDrom and onto your hard disk.

After a short time, the 'Installing package series A' screen appears and it will commence to install the desired packages.

If during a package install it comes up with any 'fatal errors', please don't die-- but make a note of the full filename and path of the package that it was unable to properly install.

It is possible that you can make another attempt later to install it without having to start the entire process again from the beginning.

Read more...

MY Banner

Lorem Ipsum

Submit your website to 20 Search Engines - FREE with ineedhits!
Submit Your Site To The Web's Top 50 Search Engines for Free!

  © Blogger template On The Road by Ourblogtemplates.com 2009

Back to TOP